Lighting is one of the most powerful tools in a photographer’s toolkit. It shapes, colours, and creates the atmosphere of your image. When you learn to control light, you gain the power to transform a photo into something truly extraordinary. In this guide, we’ll cover advanced lighting techniques and tips to elevate your photography with both natural and artificial light. Let’s dive in and bring some magic to your shots!
Contents
1. Why Lighting Matters in Photography
“Light makes photography. Embrace it. Admire it. Love it. But above all, know light. Know it for all you are worth, and you will know the key to photography.” – George Eastman
Lighting is the foundation of photography. It impacts the mood, colour, and depth of your images. Understanding lighting opens up creative possibilities, allowing you to add drama, convey emotion, and highlight key elements.
Good lighting enhances the subject, while poor lighting can make a photo look flat or unappealing. Whether you're shooting with natural light outdoors or setting up a studio, knowing how to manipulate light can truly transform your photography.
2. Natural Light Techniques
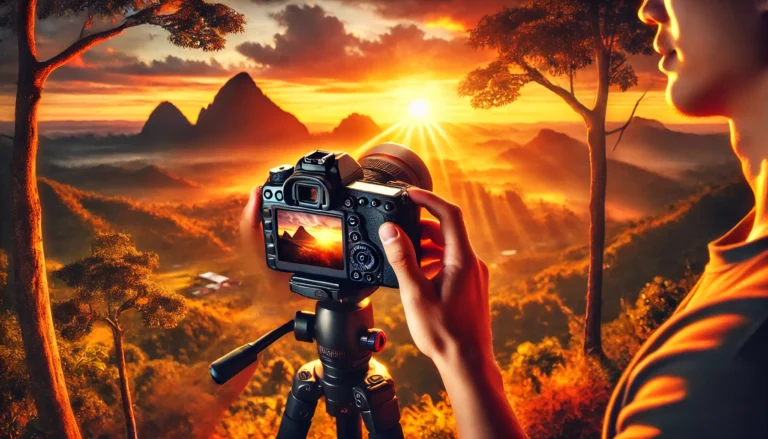
Golden Hour and Blue Hour
- Golden Hour: The first hour after sunrise and the last hour before sunset. It produces a soft, warm glow, perfect for portraits and landscapes.
- Blue Hour: The period just before sunrise and after sunset. This creates a cool, moody atmosphere, ideal for cityscapes and water reflections.
Tip: Use apps like PhotoPills to track golden and blue hours at your location!
Backlighting for Depth
Position your subject between your camera and the light source, often creating a beautiful halo or silhouette effect. Backlighting is ideal for adding depth to portraits, nature shots, and even product photography.
Window Lighting for Soft Portraits
Windows act as natural diffusers, providing soft, even lighting that’s ideal for portraits. Position your subject close to a window, and use sheer curtains to soften harsh sunlight when needed.
Natural Light Table Overview
| Time of Day | Type of Light | Best For | Characteristics |
|---|---|---|---|
| Golden Hour | Warm, soft | Portraits, landscapes | Enhances warmth, softens shadows |
| Midday | Bright, harsh | Street photography | High contrast, defined shadows |
| Blue Hour | Cool, subtle | Cityscapes, reflections | Moody, with soft cool tones |
3. Artificial Light Techniques
Artificial lighting gives you control over light intensity, direction, and colour, making it indispensable for studio photography. Here are some popular techniques:
Rembrandt Lighting
Named after the Dutch painter, this technique uses a single light source positioned at a 45-degree angle to create a small triangle of light on the subject's cheek. It’s ideal for adding depth and drama to portraits.
Split Lighting
Position the light source 90 degrees to one side of your subject, splitting the face into a light and a shadow side. This bold technique creates a moody, intense feel.
Three-Point Lighting
A staple of studio photography, three-point lighting consists of:
- Key Light: Main light source, positioned at a 45-degree angle.
- Fill Light: Softens shadows, typically placed opposite the key light.
- Backlight: Separates the subject from the background, adding depth.
Artificial Light Table Overview
| Lighting Technique | Best For | Setup | Characteristics |
|---|---|---|---|
| Rembrandt | Dramatic portraits | 45-degree angled light | Depth, triangle of light on cheek |
| Split Lighting | Intense, moody portraits | 90-degree side light | Bold, high contrast |
| Three-Point | Studio photography | Key, fill, and backlight | Balanced, professional look |
4. Combining Natural and Artificial Light
Blending natural and artificial light can yield stunning, unique effects. Here are some techniques to try:
Fill Flash in Daylight
Use a small amount of flash outdoors to fill in shadows on your subject's face. This works well in bright light where shadows can be overly harsh.
Light Painting
In low-light conditions, use a flashlight or handheld LED to “paint” light onto your subject or background. This is perfect for creative night shots, giving you complete control over where the light falls.
Adding Ambient Light
When shooting indoors, mix natural light from windows with artificial lighting. Adjust the intensity and colour temperature of your artificial lights to match the ambient light for a more cohesive look.
5. Creative Lighting Setups
If you’re looking to experiment, here are some cool, creative lighting setups to try:
Silhouette Lighting
Position your subject directly in front of a strong light source (like a window or sunset) to create a silhouette. This style is striking and dramatic, often used to emphasize shapes or poses.
Coloured Gels
Coloured gels are thin, translucent sheets you place over a light source to change its colour. Use different colours for the background and foreground for a creative, theatrical effect.
High-Key and Low-Key Lighting
- High-Key: Bright lighting with minimal shadows. Common in product photography and light, airy portraits.
- Low-Key: Darker lighting with deep shadows and minimal highlights, creating a moody, intense image.
6. Essential Lighting Accessories
Enhance your lighting setup with these must-have accessories:
- Reflectors: Bounce natural light back onto your subject, great for outdoor portraits.
- Diffusers: Soften light to create a more flattering effect; ideal for close-up portraits.
- Softboxes: Provide soft, even lighting in a studio setting. Choose a size based on your subject.
- Light Stands: Essential for positioning and stabilizing lights at different heights and angles.
Quick Tip: DIY Lighting Hacks
- DIY Diffuser: Use a white shower curtain or tracing paper as a makeshift diffuser.
- Reflector Alternative: A large piece of white poster board can act as an inexpensive reflector.
7. Lighting Tips from the Pros
Even seasoned photographers have lighting secrets that make their work shine. Here are a few to inspire you:
“Light is the most crucial element in photography, and it’s also the most elusive. Sometimes, patience is the only way to get it right.” – Annie Leibovitz
- Play with Shadows: Don’t be afraid to incorporate shadows for dramatic effect; they add depth and mood to a photo.
- Observe Natural Light: Spend time observing how light changes throughout the day, especially if you shoot outdoors.
- Use Off-Camera Flash: This gives you flexibility to control light direction and intensity, adding a professional touch.
Final Thoughts
Mastering advanced lighting techniques opens up limitless creative possibilities. Whether you’re using the sun, artificial lights, or a combination of both, these techniques will help you control, shape, and enhance your images. Remember, photography is as much about capturing light as it is about capturing moments.
Ready to experiment with lighting? Grab your camera, try these techniques, and see how light can truly transform your photography!