
Point of Sale (POS) system is an important aspect of any retail business, and Odoo provides a powerful, open-source POS module that can help businesses streamline their operations. One such task that can be automated in POS is sending automated emails when a POS session is opened. This can be achieved by using the built-in Odoo POS module, email module, and a bit of Python code.
In this article, we will go over the steps required to set up automated email sending in Odoo when a POS session is opened.
Setting up the POS and Email Module in Odoo
The first step in automating email sending in Odoo when a POS session is opened is to set up the POS and email module. This can be done by going to the Odoo apps menu and searching for “POS” and “Email.” Once you have found the modules, simply click on the “Install” button to add them to your Odoo installation.
Once the modules are installed, you will need to configure the POS and email module to work with your business. This can be done by going to the settings menu and selecting “POS > Configuration” and “Email > Configuration.” Here, you will need to enter the details for your POS and email server, such as the server address, port, and login credentials.
You will create a new Automated action using the similar settings as below:
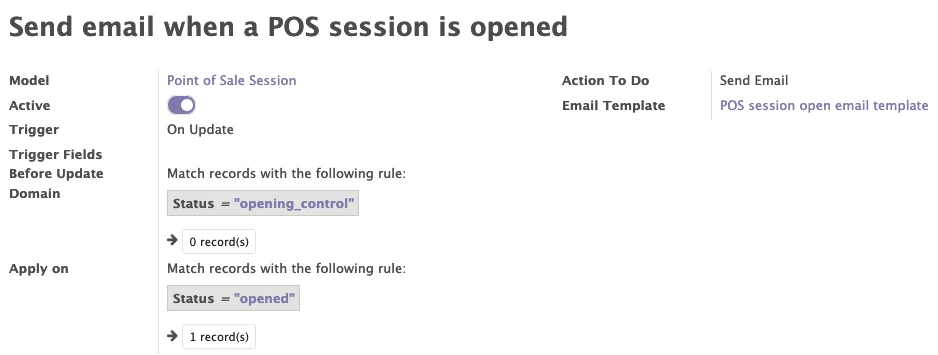
I set the “Trigger” to “On Update” because of the field we are comparing. If you want to compare other fields, you can use other suitable “Trigger”.
When looking at the fine details, The “Before Update Domain” setting can be set as the following:
[["state","=","opening_control"]]Code language: JSON / JSON with Comments (json)The Apply on Domain can be set as the following:
[["state","=","opened"]]Code language: JSON / JSON with Comments (json)For simplicity, I set the “Action to do” to “Send Email” and will use the built-in email function to send the email. You can also execute the python code to send the email.
I setup a simple email template as below. Here are some of the values I care about:
POS New session opened email template
Starting balance: ${object.cash_register_balance_start}Theoretical Closing Balance: ${object.cash_register_balance_end}Difference :${object.cash_register_difference}Order discounts : ${object.config_id.iface_discount}Total Cash Transaction (pos.session) ${object.cash_register_total_entry_encoding}Cash Journal (pos.session) ${object.cash_journal_id.name}And that's it. Save it and test your Automated action. You will receive email alters with the details of the new POS session.


